DIY: How to mount a UniFi access point to the ceiling

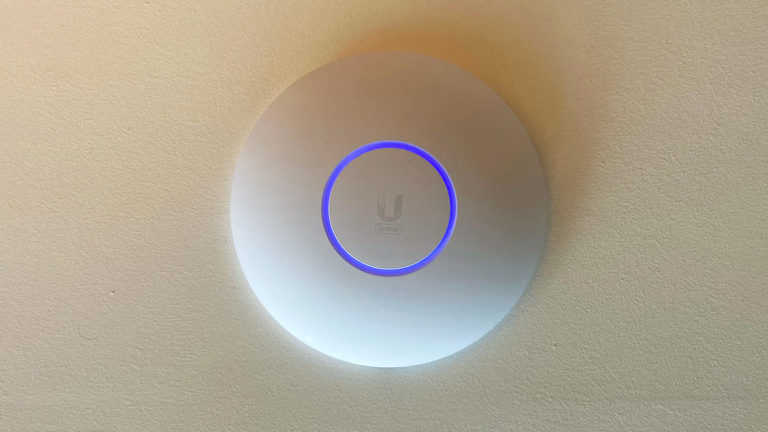
Last year when I moved into my new apartment, I upgraded to a Ubiquiti UniFi Dream Machine (UDM) router to support the gigabit Internet speed I could now subscribe to. Due to the location of the fiber optical network terminal (ONT) in my home, the UDM had to be located in the closet of my secondary bedroom, which is on one side of the apartment. Now while the UDM has a powerful enough Wi-Fi signal that can cover my apartment reasonably, the 5GHz band, is significantly weaker two walls over in my main bedroom. In addition, over the summer I realized that the Wi-Fi was also pretty spotty on my balcony due to also having to cross two walls plus glass.

So I decided to go on a quest to improve the Wi-Fi signal. The main lineup of UniFi’s access points (AP) consist of the circular-shaped ceiling-mounted access points. I decided to go for the Unifi6 Pro. Probably very overkill.

Although they can be mounted to the wall, the radiation pattern means that the area behind the wall is a dead zone. This would not work for me because I didn’t have a free wall that would face my entire apartment. Soon, I found the best place to ceiling mount an AP would be to mount it on the kitchen bulkhead. The rest of my ceiling is concrete so it would not have been easy to mount and run the Ethernet cable cleanly. With the bulkhead I could mount the AP to it and run the cable through it to the closet, which is conveniently adjacent to the kitchen. My kitchen is also pretty central to the apartment, so an AP located there would be able to cover most of the apartment by line of sight, or through one wall at most.

Just to make sure it was feasible, I popped out some of the recessed ceiling lights in order to take a look at what was inside the bulkhead. This was to check that the space I wanted to mount it was clear, and that the bulkhead did indeed run into the closet without any additional barriers.

Tools and items used:

  • Stud sensor – To find a good space to cut
  • Jab/drywall saw – To make the hole for the mounting bracket
  • Fish tape and/or Fibreglass rods – This will depend on your run. I ended up using both, using the fish tape to run the line, while using the rods to “push” or “help” the fish tape over/under some obstacles.
  • Low voltage bracket – single gang size. The UniFi AP’s mounting brackets will fit a single gang bracket with no additional holes needed. Also when you move out it will be simple to cover this with a blank plate or one with a keystone jack. You might need another one depending on where the other end of your Ethernet cable ends up.
  • Ethernet cable – your preference, depending on length and speed and how future-proof you want the cable to be. I just used typical Cat5e.
  • String – for helping pull cables
  • Punch down tool – Because my cable will be run to a network patch panel, this will be used to terminate the cable to the panel. But if you aren’t terminating at a patch panel, then ignore this.
Continue Reading

Wi-Fi everywhere!

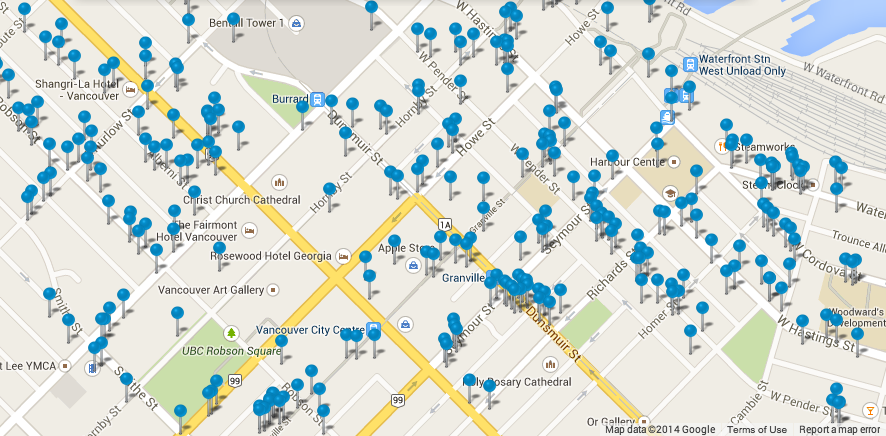
Over the past year, more and more ShawOpen Wi-Fi hotspots have been popping up everywhere around Metro Vancouver.

This is incredibly useful for Shaw customers (like me) because it’s so easy to find reliable Wi-Fi access anywhere we go.  If you’re a Shaw internet customer, you get to save several devices so that they can automatically connect to the network without having to login through the portal.

Telus is starting to form their own network as well, under the names #TELUS and #TELUSDirect.  The one advantage they have is that for Telus customers, #TELUSDirect is a secured Wi-Fi network, whereas ShawOpen is an open unsecured network.

I’m hoping that Shaw will consider providing a secure network for customers, but until then we’ll have to use our own VPN services to secure the Wi-Fi connection.

More Detailed Wi-Fi Info on Mac OS X

Wi-Fi Detail Menu
Option-clicking on the Wi-Fi icon in the menu bar brings up additional information about the Wi-Fi network to which you are connected.

The option button can be used to reveal hidden options and information in various places around Mac OS.  One example of this is if you option-click the Wi-Fi icon in the menu bar, you will be presented with additional information about the network you are currently connected to, including the type of the Wi-Fi you’re using, the base station’s MAC address, the frequency channel you’re on, and the strength of the connection, among other details.  In addition, there is an additional option to open Wireless Diagnostics which might be able to help you with Wi-Fi issues (however, in my experience it doesn’t really give useful information).

Network Utility

Network Utility on the Info tab
Info tab in Network Utility

An additional tool to help debug network connections is a neat little utility called “Network Utility” that comes bundled with Mac OS X.  You can find it in the Utilities subfolder in the Applications folder, or just use Spotlight to find it.

This utility provides a friendly interface for many tools that are commonly used on the command line for network debugging, such as ping, nslookup, traceroute, whois, and finger. An interesting tool though is the last tab: Port Scan.  Yes, Mac OS comes with a port scanner bundled with it.  Obviously one would hope that the port scanner be used for diagnostic purposes and not malicious purposes.