RAM Upgrade on a Synology ds920+

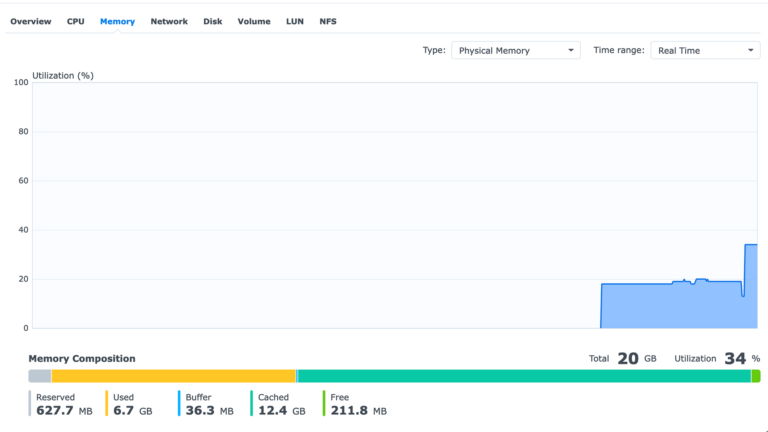
There are a lot of threads on unofficial RAM upgrades that work or don’t work on the Synology ds920+.

Just for context, the Synology ds920+ comes built in with 4GB RAM soldered in and has one expansion slot. The official maximum is 8GB, and Synology sells an official 4GB RAM stick (model: D4NESO-2666-4G) for this. However, there are many anecdotal reports that adding 8GB and 16GB RAM also work.

By running a handful of applications and Docker containers, I was maxing out the built in 4GB of RAM and spilling into swap space which slowed down the entire NAS to almost a standstill.

However, the NAS seems to be pretty finicky in what RAM it accepts or not. My first attempt was with a Kingston Fury Impact 8GB, but I could not get it stable. The system would lock up after a few minutes, if it booted up at all. I suspected that it was incompatible, although it is possible it was just the stick was bad.

Not wanting to spend more time, I went for Crucial CT16G4SFD8266 16GB upgrade. Crucial. This was recommended on other sites as well. Lo and behold, it worked the first time I put it in, and also the Synology DSM did not have any notifications that the RAM was unsupported.

So if you’re looking for an upgrade for your ds920+, go for the recommended Crucial ones, even if it’s slightly more expensive. It will save you time and headache.

Some of the links above may be Amazon Associate links and I may earn from qualifying purchases.

Handling power outages with an uninterruptible power supply and NUT

The main reason for having a UPS is to protect against data loss due to power outages whether it be unsaved work, or corruption due to the computer not having enough time to write things to disk. I only really started to take this seriously when I got my Synology networked attached storage (NAS) which holds all my data.

The UPS I chose is an APC model with 1300VA and a USB connection, which is powerful enough to power most of the critical equipment I have at home and to ensure they have enough time to shut down. One of the advantages of having an uninterruptible power supply (UPS) with a USB connection is that it is possible to smartly shut down any computers during a power outage.

My strategy is when the UPS goes on battery, I want the Windows PC and Linux server to shut down immediately (well after a 1 minute timeout). These are the heaviest load (roughly 100W each on idle) on the UPS and they aren’t running anything really important that I need during a power outage; they just need to shutdown cleanly. The Synology NAS is a lighter load so I don’t mind keeping that one on and only shut it down when the UPS battery is low. Keeping the cable modem and wireless router allows me to continue to have network access which is critical for NUT to work, but also for general productivity in case of a prolonged failure). I’ve found in past outages that the cable equipment in my apartment building has some sort of separate or backup power source as well so generally the internet can continue to work. With just the cable modem, router and Synology the power draw is about 50W. I can manually shut down the NAS if I want to prolong the network even further.

What’s this NUT you keep talking about?

NUT stands for Network UPS Tools which are a set of utilities that are cross platform and cross manufacturer that monitors and responds to changes in UPS statuses. As we will see in the following sections, Synology NAS already has built in support for NUT, and NUT tools can be installed on Windows and Linux.

Continue Reading

Upgrading memory on a Synology ds415+

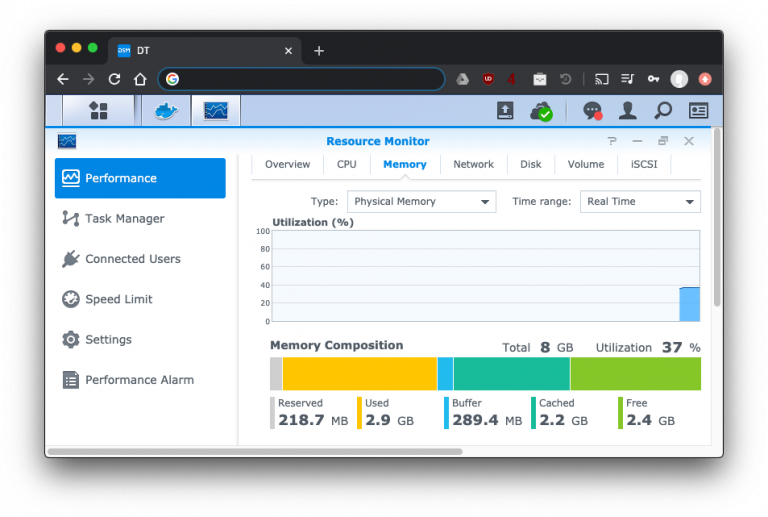
I’ve had my Synology Diskstation ds415+ network attached storage device since late 2015, replacing my custom FreeNAS box. It came with 2GB of RAM, which is fine for basic file serving, but limited when running multiple applications, including Docker containers. Once applications start swapping onto the hard disks, everything starts grinding to a halt. I finally reached the breaking point on this last night when I had to reboot the NAS once more.

Continue Reading

FreeNAS and ZFS

Since I built my home server back in 2012, I’ve had a FreeNAS virtual machine running on it as the file server of my home network.  For the past two years, I’ve been using it for the simplest of tasks (serving files).  But over the past week, I’ve started looking deeper at some of the cool things FreeNAS and ZFS can do.  The descriptions of each of these are going to be brief; they can probably be expanded to a full blog post, which I may do if I have time.  However, until then, if your interest has been piqued, you will have to do some additional research on your own.

One of the configuration screens on the FreeNAS web interface

First, let me briefly introduce what FreeNAS is.  FreeNAS is a system based on FreeBSD that primarily provides a network-attached storage (NAS) service for your network.  It uses the ZFS file system, which as you’ll see in a bit has quite a number of interesting features.  FreeNAS comes with a web interface where you can easily configure everything.

So with that introduction out of the way, let’s get into FreeNAS and ZFS!

CIFS, AFP, and NFS

In English, FreeNAS supports file sharing with Windows, Mac, and *nix computers. That was a pro for me because I have all flavours of operating systems on my computers at home.

The support for AFP (Apple Filing Protocol) includes Time Machine endpoints, which is something worth discussing in its own section below.

Networked Time Machine backups

It’s easy to setup Time Machine on your Mac using an external hard drive. However, unless you actually plug the drive in, there’s no backup opportunity.  For me, sometimes I use my computer in my living room, other times in my bedroom.  Sometimes my backup drive isn’t where I am working and I’m too lazy to go get it.  There must be a better solution.

If you’re willing to spend a couple hundred dollars for an AirPort Time Capsule, it will allow you to make backups over the network, even over Wi-Fi.  I actually bought one to try, but I returned it within a week because what it did really didn’t justify the cost.

Fortunately, FreeNAS has the option of enabling Time Machine endpoint functionality on AFP shares.  Now, whenever I’m at home within Wi-Fi range, my Mac will automatically make Time Machine backups.  Hands-free backups!  Awesome!  And with multiple Time Machine targets in OS X Mountain Lion, I’m able to have a backup to the NAS as well as a backup to an external drive whenever I get that plugged in.

My Time Machine configuration

One note is that networked backups are somewhat more finicky. The backup target gets corrupted more often than the one on the external drive.  However, I’ve noticed using OS X Mavericks and the latest FreeNAS builds that generally it is a lot more stable than when I first configured it.  Mostly, remembering to stop any current backups before turning off the computer will reduce the chance of corruption.

For more information about this, check out the following links:

Snapshots and replication

Now let’s talk about some of the features of ZFS, which FreeNAS nicely gives us access to through the web configuration.

At some point in time you may want to ensure that your data on the NAS is backed up at a remote location (because even the most complex RAID setups won’t save you in the case of a fire or flood).  This is where snapshots and replication comes into play.

ZFS snapshots are light weight and only store changed blocks.  This means that they are fast (don’t require downtime) and don’t take up much extra space on the disk.  Then, snapshots can be sent to another host with a ZFS volume over SSH.

FreeNAS’s web interface makes setting up automatic snapshots and replication very easy.  In addition, the replication target is quite flexible because all that is required is a host that has ZFS and SSH.  That means, it’s not necessary to be locked in to using a FreeNAS system as a replication target.  In fact, using packages from ZFS on Linux, most 64-bit Linux distributions can be used as replication targets.  I went with Debian as that was the easiest to setup for my particular case.

For more information about this, check out the following links:

FreeNAS plugins

I came across the plugins last week when I was diving a bit deeper into FreeNAS.  I haven’t explored this fully yet.

FreeNAS is primarily a file server.  However, as it’s a computer that’s almost always running, it makes sense to have other services run off of it so that a separate application server isn’t necessary.  This is where plugins come in.

The list of plugins is available on the FreeNAS wiki.  There is also an article on installing the plugins.

The plugins that I’m interested in are btsync (BitTorrent Sync), owncloud, and the media plugins.  Right now, I have a separate virtual machine that serves these applications while storing the data on the NAS.  Using plugins, this extra virtual machine may not be necessary!

Final comments

If you take a look at Wikipedia article on ZFS, there are a lot of interesting features in ZFS.  It supports its own type of software RAID to protect against drive failures.  It’s possible to encrypt and compress data sets as well.  This is just scratching the surface on what ZFS can do.

ZFS is a robust, reliable, and practical file system to be used as network-attached storage.  Combined with the web interface provided by FreeNAS, this functionality is able to be unleashed for usage in diverse environments.

Are you using FreeNAS or ZFS in an interesting configuration?  Have other tips for other users?  Post your ideas in the comments!

Exit mobile version